Upgrade switch sd card – Embark on an enlightening journey into the world of upgrading your Nintendo Switch SD card. Discover the myriad benefits, delve into a step-by-step guide, and equip yourself with troubleshooting tips to ensure a seamless experience. Enhance your gaming prowess and expand your digital horizons with this comprehensive exploration.
Switch SD Card Compatibility: Upgrade Switch Sd Card

The Nintendo Switch supports microSD cards for additional storage. The original Switch model supports microSD cards up to 2TB, while the Switch Lite and Switch OLED models support microSD cards up to 1TB.
All Switch models support microSD cards with a speed class of UHS-I or higher. This means that the cards can read and write data at speeds of at least 10MB/s.
Benefits of Upgrading

Upgrading to a larger SD card can provide several benefits, including:
- Increased storage capacity: A larger SD card will allow you to store more games, screenshots, and videos on your Switch.
- Improved gaming experience: A larger SD card can help to reduce loading times and improve the overall gaming experience.
- More downloads: With a larger SD card, you can download more games and apps from the Nintendo eShop.
Step-by-Step Upgrade Guide
To upgrade the SD card on your Switch, follow these steps:
- Turn off your Switch and remove the game card.
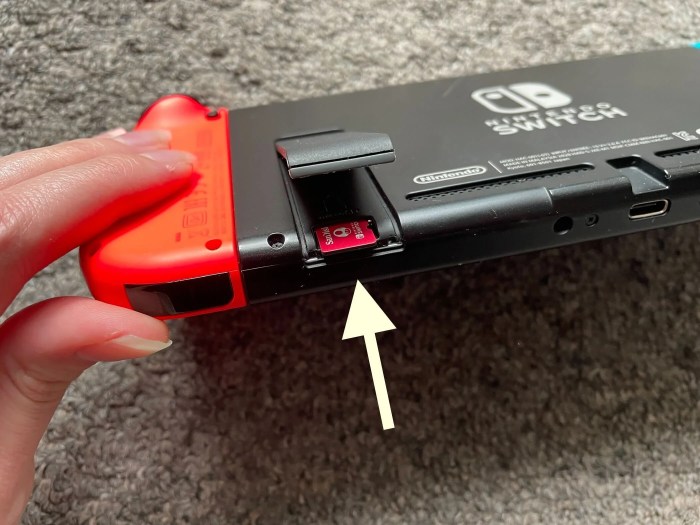
- Open the SD card slot cover on the back of the Switch.
- Insert the new SD card into the slot.
- Close the SD card slot cover.
- Turn on your Switch and go to the System Settings menu.
- Select the “Data Management” option.
- Select the “Format microSD Card” option.
- Follow the on-screen instructions to format the SD card.
Troubleshooting Common Issues
If you encounter any issues while upgrading the SD card on your Switch, try the following:
- Make sure that the SD card is compatible with your Switch model.
- Make sure that the SD card is inserted correctly into the slot.
- Try formatting the SD card again.
- If you are still having problems, contact Nintendo customer support.
Data Transfer and Management
To transfer data from your old SD card to your new SD card, you can use the Nintendo Switch’s data transfer feature.
To do this, follow these steps:
- Insert both the old and new SD cards into your Switch.
- Go to the System Settings menu.
- Select the “Data Management” option.
- Select the “Transfer Your Data” option.
- Follow the on-screen instructions to transfer your data.
Recommendations and Considerations
When choosing an SD card for your Switch, there are a few things to keep in mind:
- Speed: The speed of the SD card will affect the loading times of games and apps. Choose an SD card with a speed class of UHS-I or higher.
- Reliability: Some SD cards are more reliable than others. Choose an SD card from a reputable brand.
- Compatibility: Make sure that the SD card is compatible with your Switch model.
Questions Often Asked
What are the compatibility requirements for upgrading my Switch SD card?
The Nintendo Switch supports microSDXC cards with capacities ranging from 64GB to 2TB. Ensure that your chosen card is compatible with the latest firmware updates.
How do I transfer data from my old SD card to the new one?
Connect both SD cards to your computer using an SD card reader. Copy all files from the old card to the new card, ensuring that you preserve the folder structure.
What should I do if my new SD card is not recognized by my Switch?
Verify that the SD card is properly inserted and that it is compatible with your Switch model. Try restarting your Switch or formatting the SD card using the console’s built-in formatting tool.